Giving a Subcutaneous (Sub-Q) Injection (Single Medicine)
Giving yourself a subcutaneous injection (also called a sub-Q injection) means inserting medicine into the fatty areas just under your skin. The needle used for a sub-Q injection is very small and doesn’t cause much pain. Many medicines are given in this way.
Your healthcare provider has prescribed the amount and times you need to give the medicine.
The name of my medicine is: ______________________
Amount per injection: ____________________________
Times per day: _________________________________
Step 1. Preparing a work area
-
Put any pets in another room.
-
Wash your hands for 1 to 2 minutes with liquid soap and clean, running water.
-
Clean your area with soap and water. Dry with a paper towel.
Step 2. Gathering your supplies
Collect the following items:
-
Your medicine. Keep in mind that some medicine vials must be taken out of the refrigerator at a specific amount of time before you inject them. Read the label and follow the instructions.
-
A sterile disposable syringe (don’t reuse your syringes)
-
Alcohol wipes or swabs
-
Special container (sharps container) to throw out the used syringe. You can buy a sharps container at a pharmacy or medical supply store. You can also use an empty laundry detergent bottle, or any other puncture-proof container and lid.
Then wash your hands again.
Step 3. Choosing your injection site
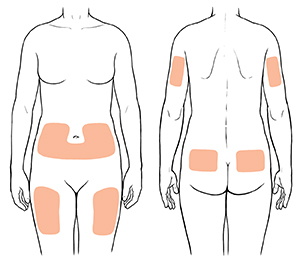 |
| Injection sites in adults include the belly (abdomen), front of thighs, back of upper arms and upper buttocks. |
-
You may find that the easiest and safest places to inject medicine are these areas:
-
If you are very thin, don’t use your belly for your injection site, unless your healthcare provider tells you to.
-
Stay away from areas that are red, swollen, or bruised.
-
Don't inject in the same site twice in a row. Choose a site that is at least 2 inches away from your last injection site.
Step 4. Getting the medicine ready
Note: Skip this step if you're using a disposable injection pen. This is a syringe already filled (or prefilled) with a set amount of medicine. Once you inject the medicine, you throw the pen away.
-
Remove the cap from the vial. Clean the rubber stopper on top of the vial with an alcohol wipe.
-
Remove the syringe from its package. Don’t use a syringe from a previously opened package or a package with holes in it.
-
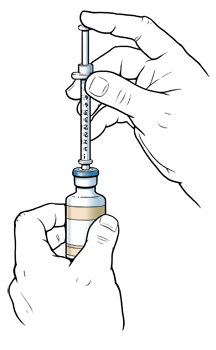
Take the cap off the needle. Pull back the plunger, drawing air into the syringe. The amount of air should be the same as the amount of medicine your provider has prescribed for you.
-
Push the needle into the rubber stopper of the vial. Once the needle is through the stopper, push the plunger on the syringe so that the air goes into the vial.
-
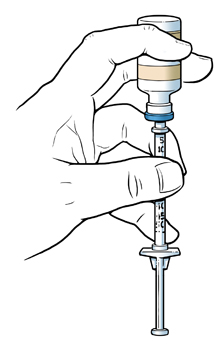
Keep the needle in the stopper and turn the vial upside down.
-
Keep the tip of the needle in the liquid and pull back on the plunger. The medicine will flow into the syringe.
-
Fill the syringe to your prescribed dose amount.
-
If you get too much, push some medicine back into the vial with the plunger.
-
If you didn’t get enough, keep pulling on the plunger.
-
Check for air bubbles in the syringe.
-
If you see air bubbles in the syringe, gently tap the syringe while the needle is still in the stopper. The air bubbles will move to the top of the syringe.
-
Push the plunger slightly, and the air will go back into the vial.
-
Check to make sure the syringe contains the prescribed amount of medicine. Then pull the needle out of the vial.
Step 5. Giving the injection
-
Using an alcohol swab, clean the injection site. Make sure the cleaned area is about 2 inches in diameter.
-
While the injection site dries, double-check that you have the right amount of medicine in your syringe.
-
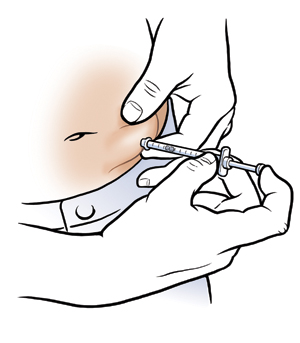
Place your thumb and forefinger on either side of the clean injection site. Pinch up about 2 inches of skin.
-
Hold the syringe like a pencil. Insert the needle straight into your pinched-up skin. Insert the needle quickly. It will hurt less. Note: The best angle for inserting the needle will depend on your body type, the length of the needle, and the injection site. Your healthcare provider will help you find which angle is best for you.
-
Be sure to insert the needle with the bevel up and insert all the way to the end of the needle. This will help you inject the medicine correctly.
-
Release the skin, holding the syringe in place.
-
Inject the medicine. If your provider has told you to pull back on the plunger to check for blood before injecting the medicine, then do so.
-
If you see blood in the syringe, don’t inject. This means that the needle has entered a blood vessel. Withdraw the needle, select a new injection site, and repeat the steps above for getting the site ready.
-
If there is no blood in the syringe, continue with the injection. To inject the medicine, slowly push the plunger all the way down.
-
If you are injecting insulin, don't pull back on the plunger to check for blood. Inject the insulin by slowly pushing the plunger all the way down.
Step 6. Removing the needle
-
Remove the needle from your skin and hold a gauze or cotton ball on the injection site for a few seconds. Don’t rub the injection site.
-
If you see blood or clear fluid, press on the injection site with the gauze or cotton ball for 5 to 8 minutes. Don’t rub while pressing. Apply a bandage if you wish.
-
Don’t recap the needle.
Step 7. After the injection
-
Put the needle and syringe in the sharps container. Never reuse the syringe. Make sure the needle points down. Never put your fingers into the container.
-
When the container is full, dispose of it correctly according to your community's guidelines. Ask your healthcare provider, health department, or local trash service how to dispose of sharps if you aren’t sure.
-
Record the site, date, and time of each injection.
Follow-up care
Follow up with your healthcare provider, or as advised.
When should I call my healthcare provider?
Call your healthcare provider right away if any of these occur:
-
You are unable to give your injection
-
Bleeding at the injection site for more than 10 minutes
-
Injection of medicine in the wrong area
-
Injection of too much medicine
-
Rash at the injection site
-
Redness, warmth, swelling, or drainage at the injection site
-
Fever of 100.4° F ( 38.0°C) or higher, or as directed by your provider
-
Signs of allergic reaction. These include trouble breathing, hives, or rash.